
Welcome to Our House
Photos for this week’s post follow the red, white, blue theme combined or on their own. Here’s the first photo that my media library surfaced when I searched on red:
Monthly Color Photo
Red, White, Blue
Unless I have something new in my camera roll, a quick search in my media library usually surfaces a few ideas for these weekly photo prompted posts.

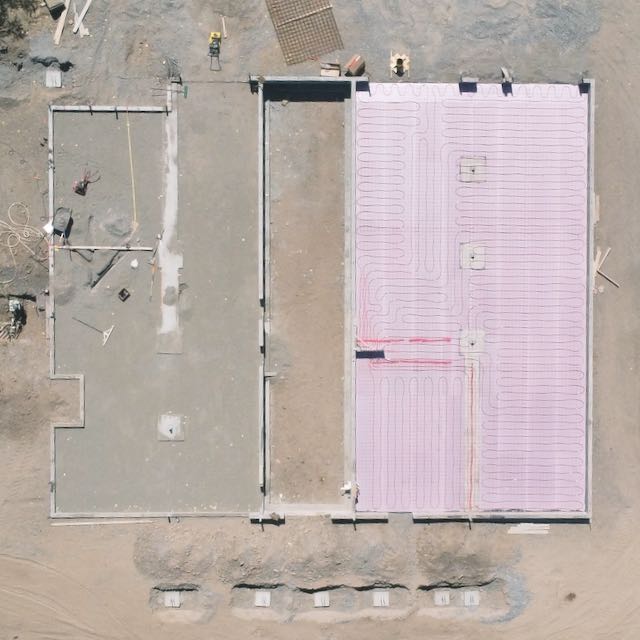
Is this nice red and white photo have you asking, what is that? Keep reading. It is definitely a part of our shouse (shop/house) build. So for this week, I decided it was time to put together a few photos documenting our shouse build progress.
The zip tie photo above is just before our shop concrete floor was poured. It’s a fun glimpse at our hydronic floor tubing (red) and what felt like 1 million zip ties (white) I used to secure the tubing in place. Mr. concrete guy was very impressed with my zip ties as it made their job easier with no worrying about the tube floating up to the surface or being cut when they do the saw cuts.
Recap July-December 2023
Nearly a year ago, ground was broken, forms were set, concrete started to take the shape of forms and stem walls. A blue crane came and went multiple times depositing concrete mix for the crew to systematically nudge and smooth in place.

During the peak heat season Steve and I built out the indoor pool which needed to be done before framing could begin. Once the pool (with a blue liner) was built out, additional fill was added followed by the last concrete pour. Our target was to get the place dried in so we could lock up and leave. We’d not get much done in freezing structure through winter.

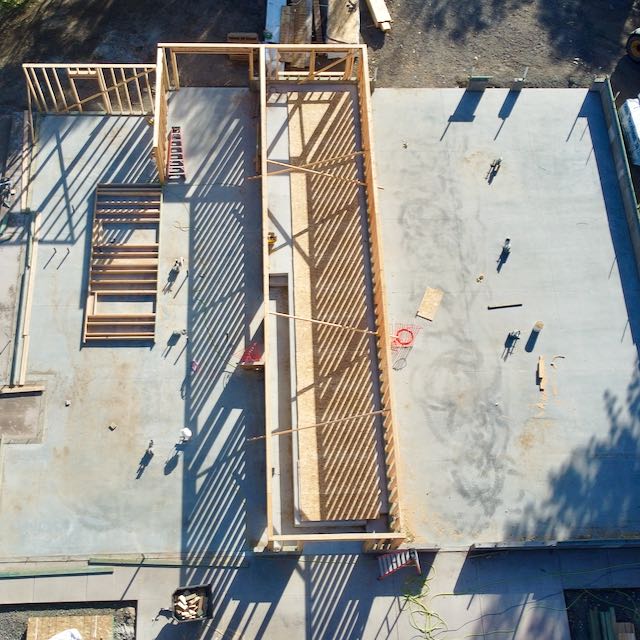

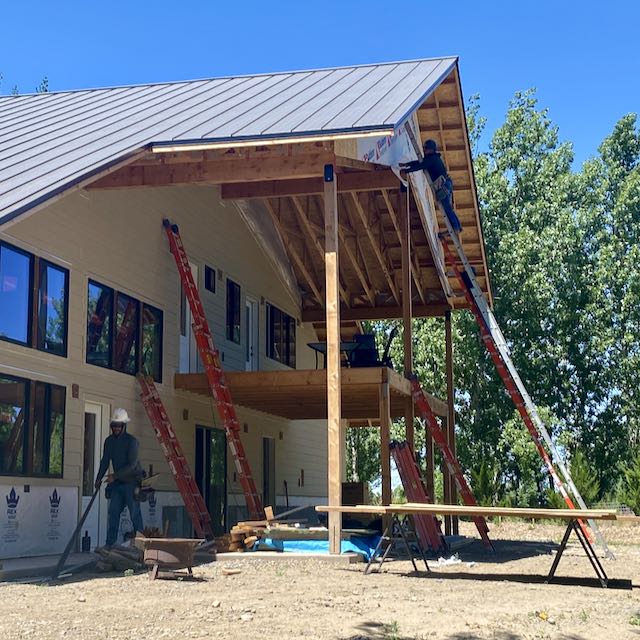
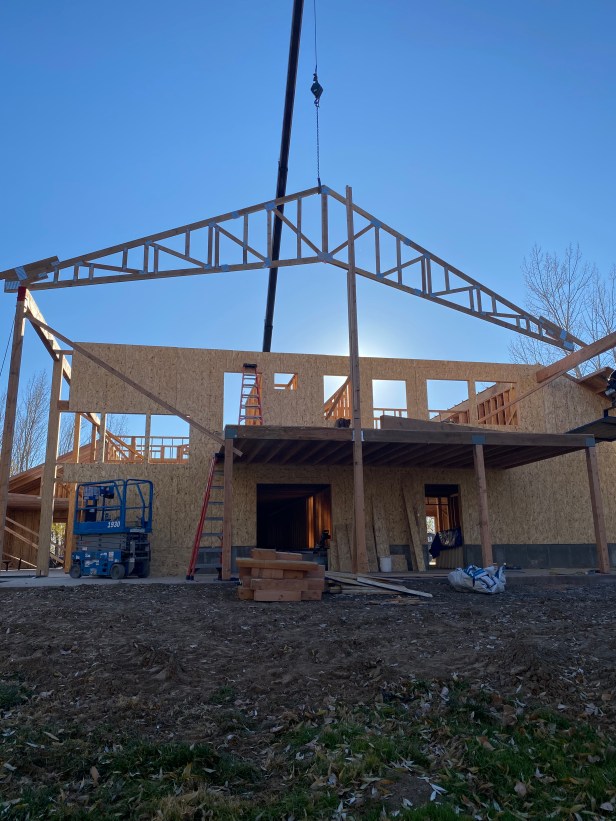
The concrete and earth work took several weeks and included a period of no concrete being available to even haul in. The framers were ready before we were due to the final pool concrete pour. At the beginning of September, framing started, stopped, started, then finally by week 3 we had them every day til dark. Two framers, sometimes 3 made this a long phase before they were done.
A big milestone was swinging our trusses up on the roof. Under the dark blue of twilight the large trusses were lifted and secured in place.
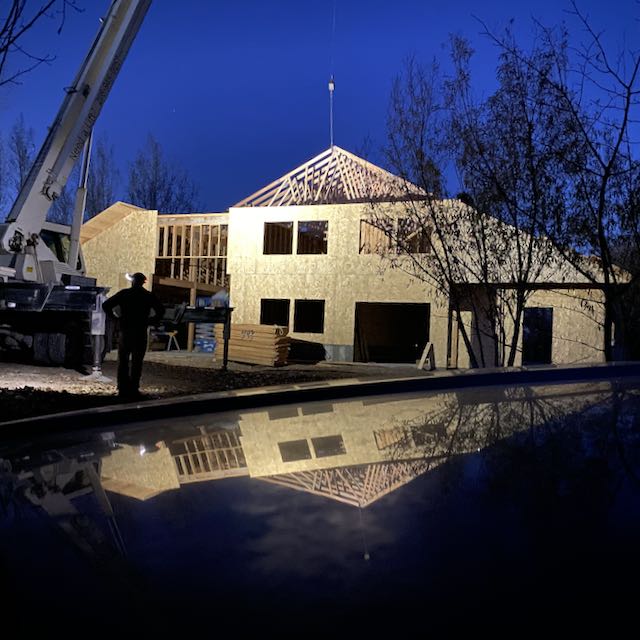

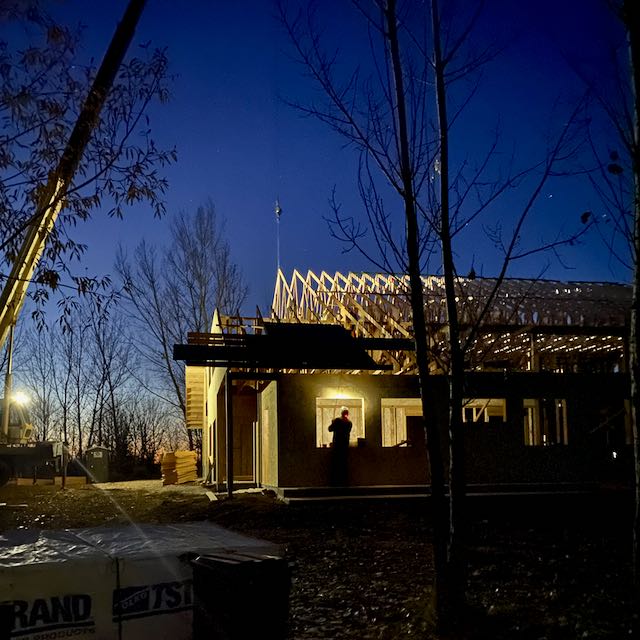
Our final goal was met, the house was considered dried in. Steve and I placed on the roofing underlayment in between snow storms to keep the wetness at bay for the next 3 months.
Spring Activity
We got restarted in mid March or tried to restart. It was still plenty cold here making work inside the house challenging, but Steve started plugging away at the sewer plumbing lines. Notice how we keep sticking to the blue color theme?


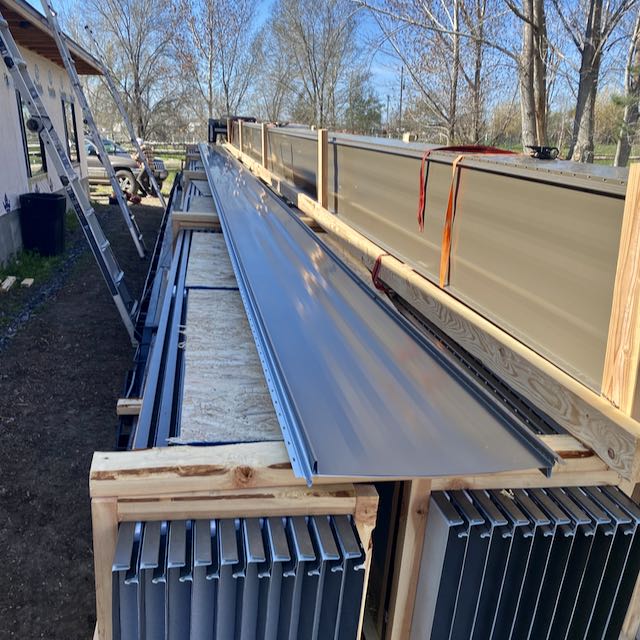
It took over a month before the weather would comply long enough for roofing to begin. Our roofer, Casey came out on site as soon as the roof was dry. Two weeks later, Casey along with his guys and Steve formed a four man crew wrangling 43′ long panels up on the roof. Two weeks with a few days of rain and wind in the middle and our roof was finally done. Now, I’m breaking from the color theme of this post as the roof isn’t red, white or blue.


I won’t bore you with more photos of wiring or ABS pipe connections but know that when Steve wasn’t roofing he was spending most of his work day diving into electrical wiring. We estimated 3000′ if not more of wire has been installed, plus CAT cable and last will be a few low voltage lines.
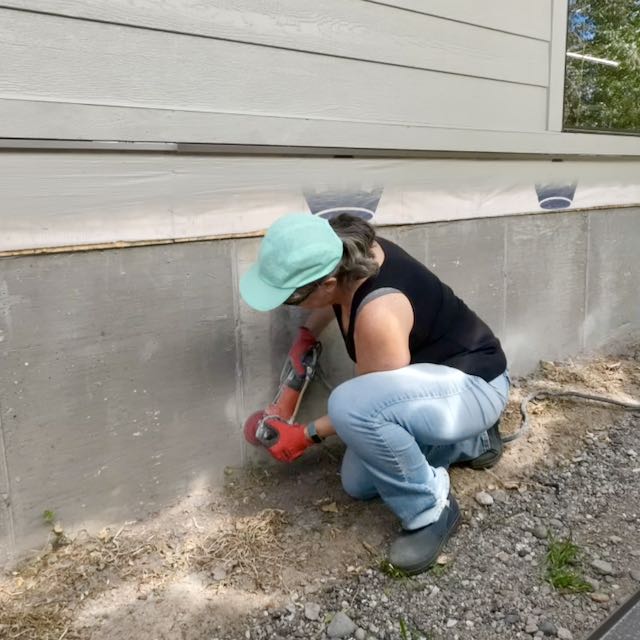
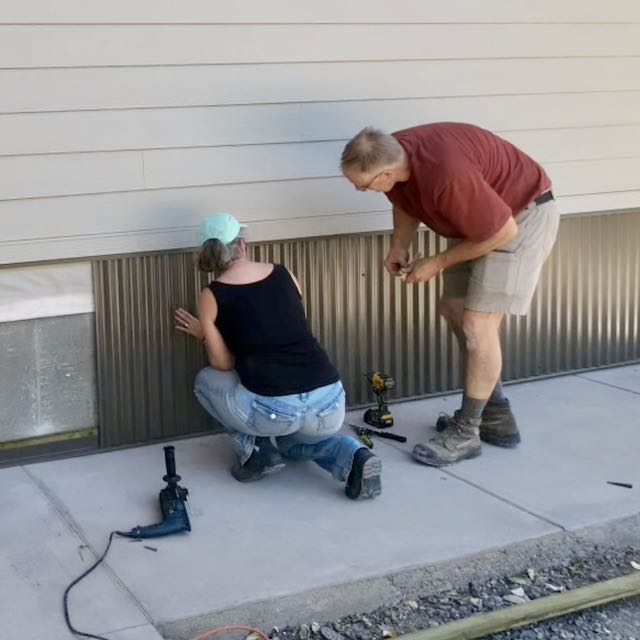
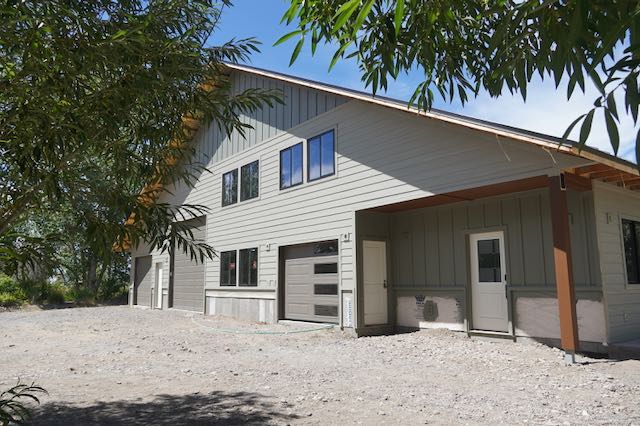
While Steve continued working on electrical and plumbing, I was able to find a siding contractor and a painting contractor to get the exterior finishes going.


Once their work was completed, Steve and I spent a couple of days, installing metal corrugated panels on two sides of the house.
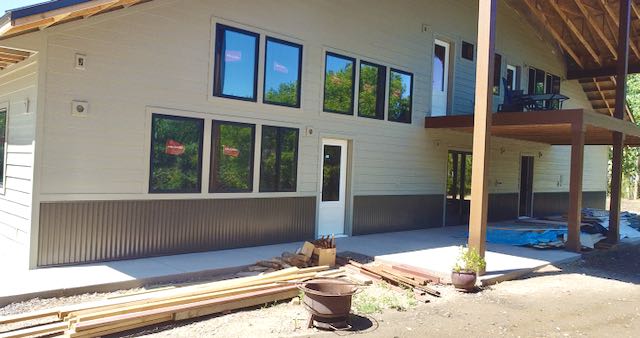
The last pieces will be a stone veneer on the front (seen from the road) wall; that’ll happen after the driveway is poured which isn’t until after drywall material gets trucked in. When we completely paint the interior, I’ll tackle all of the exterior door painting.
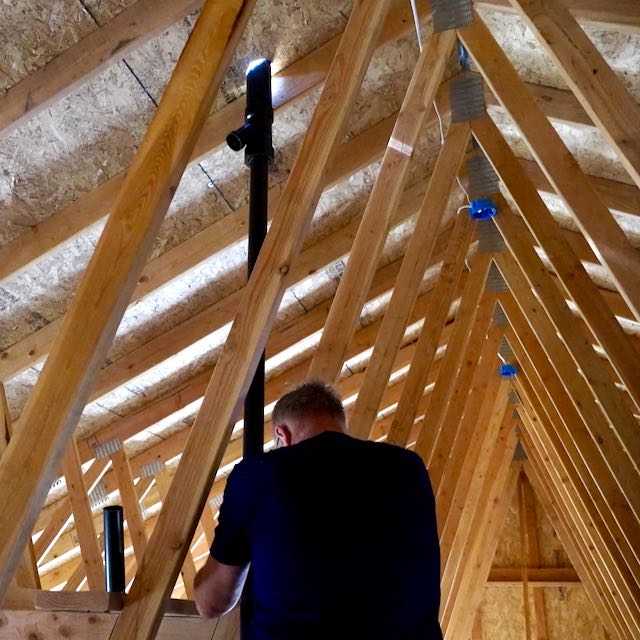
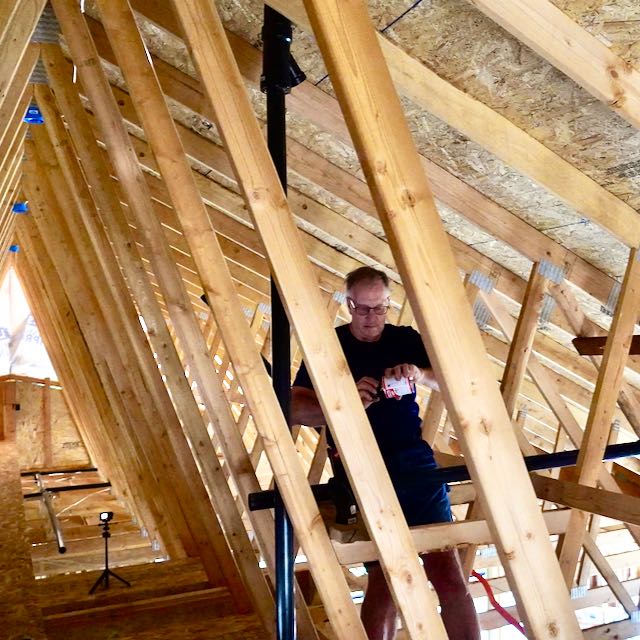
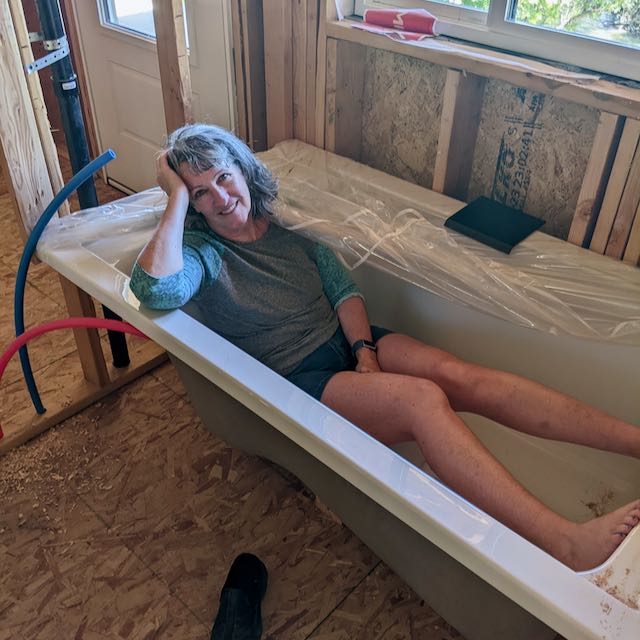
White tub and Red+Blue Water lines Our Summer building objectives is to get us to interior drywall and painting; Both contractors are already queued up which makes my work simple from here on out. Although (1) the electrical is down to a single area yet to be wired and a list of miscellaneous cleanup tasks and (2) the plumbing is march into the final leg of work, the (3) HVAC and Air Ventilation systems will soon be procured. While the outside temperatures soar, Steve will be spending more time in the attic. The heat will make for slow steady and sweaty progress.
Red, White and Blue
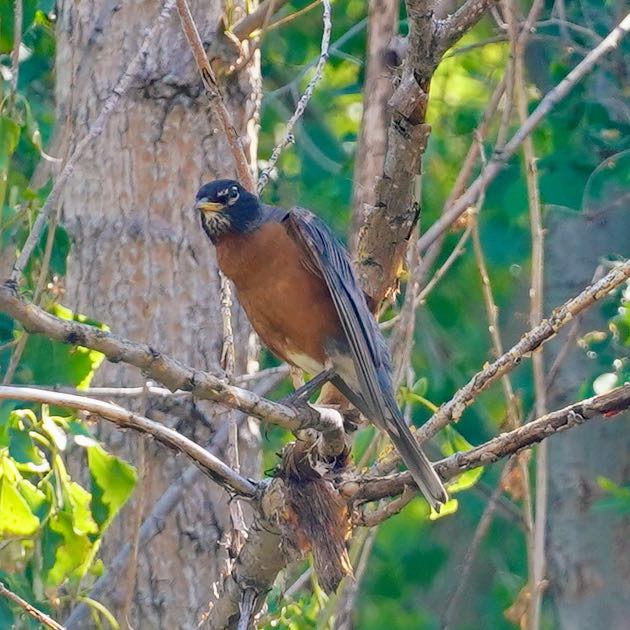
Although many of our construction pictures did fit the red, white, and blue photo theme, I think this one is also a better fit. Our local red robin with his proud red chest, blu-gray feathers and white belly are fun entertainment after the sprinklers are done running and the worms are easily available. They also have been enjoying the cherry tree too!
Colorful birds seem to always be challenging to catch and up until now, unless they would remain still until I could approach closer, I could never catch a a photo of our red robins hanging in the yard.
I hope you enjoyed the photo construction update. We’ll be hanging out here through the summer with a goal of achieving a temporary if not full occupancy permit in the fall. Be nice to move out of the camper and into the home before the weather starts cooling down later in the year.
Our Previous Shouse Post Plus Dried In Tour Video

About the Photo Challenge
A weekly themed photo challenge hosted by Terri. Check out her Blog and come back to visit for more SundayStills and traveling posts!
More Sunday Still Posts
Thanks for visiting our travel blog and I hope you enjoyed finding the #SundayStills Challenge. You can join the weekly challenge by visiting our hosts blog Second Wind Leisure. and checking out Terri’s post for this week, Monthly Color: Red, White and Blue.
If you enjoy personal travel stories and especially camping, follow this blog by entering your email below. You can also follow us on Instagram @WorkingOnExploring or @Maximus.4×4.camper, and subscribe to our WorkingOnExploring YouTube Channel on for our build and trip clips. Good luck on your own exploring and we’ll see you from the road somewhere soon!
Follow WorkingOnExploring travels and ongoing #SundayStills photo Challenge Posts
Delivered directly to your email inbox.

Loved seeing this Cheryl! I’ll come back for a deeper dive. I love your eye for the colors and you’re a lovely writer, as well! I hope you feel the satisfaction of this massive creative project all along the way. You are pouring your love and creative spirit into a beautiful home. You are on the top of my list for a zombie apocalypse destination. But I hope to visit before then. 🙂
LikeLiked by 1 person
I’ll make sure you get her long before then! Thank you for your thoughtful and encouraging words as well…you always know how to tug at a girls heartstrings. Hugs…your fav SIL
LikeLike
Lots of great progress. Love all the photo updates!
LikeLiked by 1 person
As I wrote this post out, it did feel like a lot of progress, yet sometimes it seems to be moving so slow!
LikeLike
looks fantastic! Well done!
We want to install floor heating ourselves. Got any tips??
LikeLiked by 1 person
Steve was quite pleased with the suggestion to get a tube un-coiler. However, they’re quite expensive to purchase (~$300) so he made one out of a sonatube and a 10″ lazy susan bearing mounted on top of a wood platform. We had more images and hydronic info in our video which is in the 2023 post. Figure out your zones and layout before starting. We varied some from the original paper version but the goal was to keep the lengths somewhat closer together which will help with the managing the flow settings later on. Your max length is 300′ per zone. The installation of it all was straightforward although tedious. He unrolled and positioned and I came along and ziptied every foot or so.
LikeLike
Wow, how exciting! You will have a beautiful home. Let me know when the housewarming party will be. 🙂
LikeLiked by 1 person
Every is invited! But we’ll not host it in this heat…wowza. I think it’ll take us through next spring to really wrap up all the interior work especially since we’re doing most of it once the drywall is installed and painted.
LikeLiked by 1 person
Wow, you are making such great progress, Cheryl! Great shots of all that work! Nice way to work in the RWB pics 🙂 I’m super impressed you are there working with power tools!
LikeLiked by 1 person
Power Tools are magical things unfortunately I still rely a lot on my coach to get me setup and going. For that project I did pretty well but it was a struggle physically to drive the metal screws through the panels, drip edge then wood. I’d get one done and Steve would have 3 or 4 done. On a positive note, I think my biceps are bulging…lol.
LikeLiked by 1 person
What an interesting retirement you’re having! It has been fascinating watching your travel adventures and now the house. Who knew building contractor/ construction worker was part of your repertoire. Thanks for sharing the project progression.
LikeLiked by 1 person
Thank you Vicki. It certainly isn’t boring and I feel like I’ve had to re-enter the school of hard knocks periodically. I’d never accomplish this much without Steve. Fortunately, I can cherry pick my projects to fit my skill level and strength. Getting out there and physically accomplishing something is much more satisfying than making calls, asking for bids, paying bills, etc. I’m loving this retirement and am so grateful to have been able to pull it off in my 50s so we can spend our energy creating and living our dreams.
LikeLiked by 1 person
Looks like it’s fairly finished on the exterior, but how about interior? And, how did you get those aerial views?
LikeLike
No boring pictures of lots of plumbing and 3000′ of electrical wire is what my post claims. The order of events is you have to complete rough in electrical wiring, plumbing, hvac/venting/air handling before you can proceed. I did state where I think we are on those stages then once Steve thinks he’s completed those 3 big systems areas, there’s 4 inspections that get done before we can proceed to building out the interior starting with insulation and then drywall painting, cabinet assembly and install, lots of finish work to be done, kitchen and plumbing fixtures.
LikeLike