
The camper build continues to march forward. Progress appears slow when the focus shifts to infrastructure and the wet bay has been a challenge, fitting in all the necessary components.
It’s a critical step to making this tiny house livable. It’s designed to sustain us over 2 weeks boondocking, including the water supply. Or, even longer, if there’s an outside water source available to pump from.
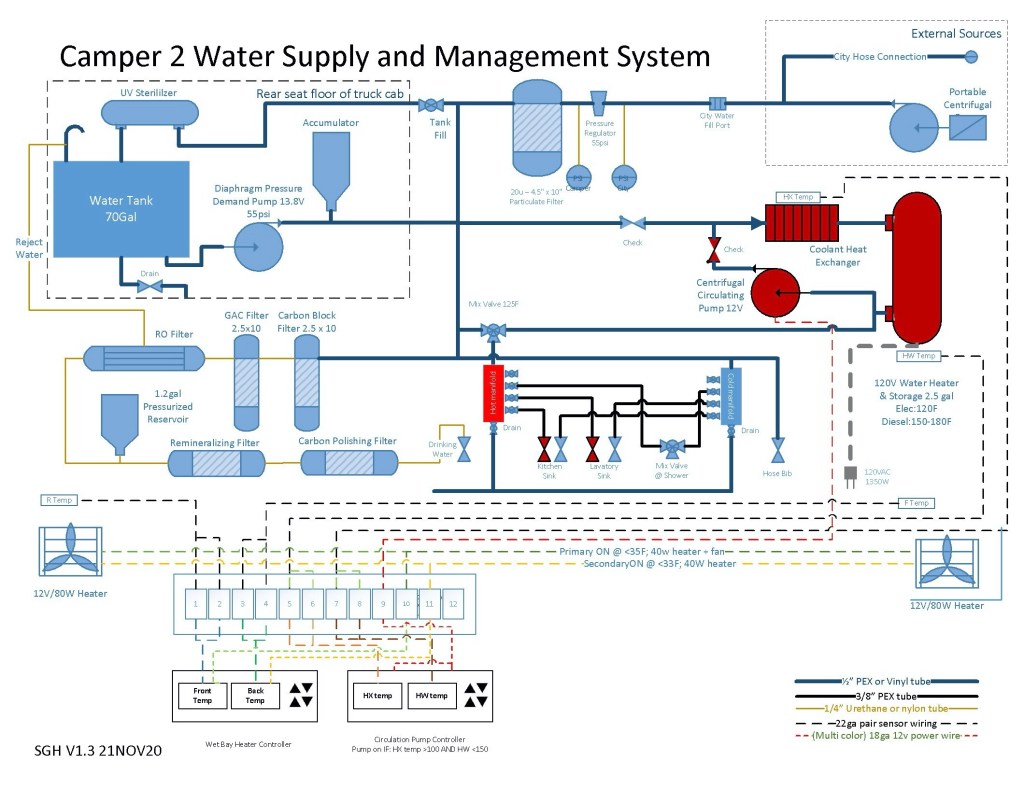
Design Goals
- Centralize all fittings in the wet bay and improve overall serviceability
- Add capability to turn off water to each camper zone (kitchen sink, bathroom sink, shower); no toilet as we’re going to install a composting toilet
- Add a particulate filter for incoming water before it goes into fresh water tank
- Add a UV sanitizer for all water going into the fresh water tank (stored near the fresh tank)
- Add a reverse osmosis system for our drinking water. Eliminates the need for separate drinking water jugs. They take up storage and counter spaceroom and plus it’s another item to get refilled every 5-6 days.
- Optimize the water heating capability by adding a coolant heater exchange; eventually adding diesel powered heating for both water and camper heat.
- Eliminate propane dependency
- Design in temperature monitoring for both the water heating and the cargo box; includes custom build cargo box heaters!
The improvements over our old standard camper are easier maintenance, more flexibility, and higher capacity.
Water Sources
The water input will be on the the drive’s side. At that control, will also be a switch to turn on the UV sanitizer. While filling up the tank, water will first run through the particulate filter in the wet bay through. Then it’ll flow eventually pass through the UV sanitizer before going into the tank.
Improvement over a standard camper: provides option for pumping in water from an outside source, I.e., river or lake. And gives us a safe source if our non-potable source is suspect or non existent.
Water heating
The hot water is setup to flow through a circuit containing the coolant water heater and an electrical water heater. Eventually the diesel heater will be added as a 3rd source for heat.
Improvements: no more propane required for heating water. When driving the coolant heat exchanger will be heating the circulating hot water eliminating our lag time to having hot water at the end of the drive day and reducing electric heating needs.
Future enhancement: adding the deisel heater will provide a 3rd method of heating water and further reduce dependency on electric heating.
Drinking Water
We’ve been using three 3-gallon water jugs for our drinking water. Based on activity and weather, they currently last us 1.5 to 2 days. Now with a built in RO filtering system and drinking water storage tank, we will have clean, safe, nice tasting water on demand. Obviously, it’s a trade off between needing to have drinking water onboard separate from the tank, storing it, and consuming precious counter space versus having a filtration system, pump, 1.5 gal reservoir in the wet bay.
The flow rate is xxx gpm thru the RO system and into the 1.5 gallon tank. That’ll generate plenty for us to fill up multiple bottles, refrigerator water, ice cube trays, etc. and still have water on demand for cooking time.
Materials / Component Sources
Most of the individual items were sourced from ebay (coolant heat exchanger) and Amazon (water heater). We were mainly locating good quality pieces based on reviews at a fair price. Not too high and not too low (cheap). The pex, fitting, valves, etc were purchased from supplyhouse.com and home depot. Due to the tight fit of everything and mounting in a way to ensure accessibility and servicing needs are met, a few parts were very specific angles and size.
Water Supply and Management System Schematic
Video Walking through the System
We both walk through the system showing the components installed into the wet bay. And go into details on how to manage water heating and keeping the cargo box above freezing with custom heaters. If you enjoy following the build progress like the video and subscribe to the channel.
Ford F350 Details
We have worked out the kinks in the 2004 Ford F350 and will continue to commission it to carry the new flatbed camper. Above, we cover the key priorities that went into the camper design. It’s great food for thought and a review of the trade offs to consider. You can also read more about our Ford F350 (a “franken” truck) background by clicking HERE.
Where to Next?
No big travel plans until this camper is in a usable state. The target is end of January 2020. There’s a lot of work to do in less than 2 months.
If you enjoy personal travel stories and especially camping, follow this blog by entering your email below. You can also follow us on Instagram @WorkingOnExploring or @Maximus.4×4.camper, and subscribe to our WorkingOnExploring YouTube Channel on for our build and trip clips. Good luck on your own exploring and we’ll see you from the road somewhere soon!
Follow WorkingOnExploring travels and ongoing #SundayStills photo Challenge Posts
Delivered directly to your email inbox.
